
How I Fixed a Vintage Technics CD Player for Under $20
Have you ever wondered if you could fix classic stereo gear yourself? I recently bought a vintage Technics CD player at auction for a surprisingly low price. I had no idea if it even worked. In this post, I’ll walk you through the entire process of testing, diagnosing, and repairing this piece of 1990s audio history. The fix was simple, cheap, and brought a great mid-range player back to life. This shows that with a little know-how, you can save older electronics from the landfill.
Meet the Technics SL-PS700: A 1990s Mid-Range Powerhouse
The player is a Technics SL-PS700. It’s a mid-range model from the 1990s. The first thing you notice is its weight. It feels solid, tipping the scales at around five or six kilos (11-13 pounds). This heft suggests quality construction.
However, much of that weight comes from the metal front panel shield. Underneath, the chassis and many internal parts are plastic. This is common for Technics gear from this period. The transport mechanism, or “mech,” is also mostly plastic.
I won this player at an auction. The final price was just £16 plus fees. Buying this way is a gamble. You only see pictures. The item is sold as-is, often sitting in a storage room. You don’t know its history or if it powers on. I took the chance, hoping for a simple fix.
Initial Power Test Reveals a Common Fault
The first step was to see if it worked. I connected it to power and hooked up audio cables to an amplifier. I turned everything on. The player already had a CD inside—a CD-R, which was a good sign.
The disc began to spin and play. But there was a clear problem: sound only came from the right speaker. The left channel was completely silent. I swapped the audio cables at the amp to confirm the issue was with the player, not my cables. The fault stayed on the left channel.
Finding only one major issue was promising. This was a relatively expensive machine in its day. A simple audio output problem is often an easy repair. I also noted a missing knob on the front. That’s a minor cosmetic issue I could fix later from my spare parts.
The player read the CD-R without any skipping or hesitation. This meant the laser and main mechanical functions were healthy. The problem was likely isolated to the audio output stage.
Opening Up the Technics CD Player
With a fault identified, it was time to look inside. The goal was to access the main circuit board (PCB) where the audio output sockets are mounted.
Technics equipment from this era is known for dry solder joints. This is when the solder connection between a component and the board cracks over time. Heat, vibration, or physical stress from plugging in cables can cause it. Amplifiers from this brand are especially prone to it.
I carefully removed the top cover, watching for fragile plastic clips that can break. The internal layout was straightforward. For a mid-range unit, it wasn’t overly complex. Much of the cost likely went into the servo mechanism that reads the disc.
To reach the back of the main board, I removed the rear panel. Instead of disconnecting all the internal cables—a time-consuming task—I used a shortcut. By loosening the board and sliding it forward, I could tilt it up. This gave me access to the solder points without fully removing it. This method saves time and reduces the risk of damaging ribbon cables.
Diagnosing the Left Channel Fault
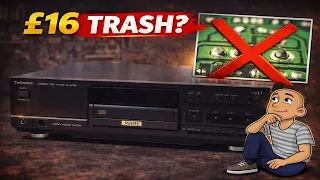
With the board tilted, I could inspect the audio output sockets. The problem was immediately obvious.
The left channel RCA socket was physically loose. Zooming in showed the solder joints had completely failed. The socket was hanging on by its plastic mounting. It had almost no electrical connection to the circuit board anymore. This explained why no audio signal was passing through.
This is a classic dry joint fault. The solder cracks and breaks contact. It’s a very common issue on any connector that gets frequent use or stress. The constant plugging and unplugging of cables finally broke the weak solder.
Seeing this was a relief. If this was the only fault, the repair would be quick and successful. I decided to check the other sockets while I had the board accessible.
The Repair: Resoldering the Faulty Connections
The fix was simple. I needed to resolder the left audio socket and check the others.
I used a trusty Weller soldering iron. First, I reheated the existing solder on the left socket’s pins. I added a small amount of fresh solder to ensure a strong, new connection. The socket was now firmly anchored to the board.
Good repair practice means checking nearby components. I also resoldered the right audio channel socket and the adjacent sockets. This included the optical digital output. This preventive work ensures no other dry joints fail soon.
The rest of the board used surface-mount components. These small parts are less likely to develop dry joints from physical stress. The main suspects are always the larger connectors mounted on the board’s edge.
After resoldering, it was time to put everything back together. I slid the main board back into place. I aligned it with the front panel connectors and secured it with screws. Finally, I replaced the rear panel.
Testing the Repair: Back in Full Stereo
The moment of truth arrived. I reconnected the power and audio cables to the amplifier. I inserted the CD-R that was originally inside.
I turned the system on. This time, clear music played from both the left and right speakers. The repair was a complete success. The player functioned perfectly, reading discs without issue.
The total repair cost was essentially just the auction price. The only parts used were a bit of solder and electricity for the iron. In less than an hour, a vintage Technics CD player was restored to full working order.
This project had a very happy ending. What seemed like a risky auction buy turned into a fantastic value. The player is now ready for many more years of service.
Conclusion: Why Repairing Vintage Audio is Worth It
Fixing this Technics SL-PS700 was satisfying. It proved that many “broken” vintage electronics aren’t truly dead. They often have one or two simple, fixable problems.
Common issues like dry solder joints are easy to diagnose and repair. You only need basic tools: a screwdriver, a soldering iron, and some solder. The skills are easy to learn with practice. Many tutorial videos and guides exist online.
Repairing gear has major benefits. You save money compared to buying new or working vintage gear. You also keep perfectly good equipment out of landfills. This is better for the planet. Finally, you gain the satisfaction of using something you brought back to life yourself.
This Technics player is a great example. It was built to last, with a solid core design. A single point of failure—a dry joint—had sidelined it. A simple, low-cost fix returned it to full glory. The next time you see an old piece of stereo gear listed as “for parts or repair,” remember this story. With a little effort, you might just uncover a hidden gem.