
Saving a Legend: Technics SL-P990 Direct Drive CD Player
Do you have a classic Technics CD player from the late 90s that spins the disc but won’t play it? Many people blame the laser. They often replace it, but the problem stays. That fix is a waste of time and money for most of these high-end machines. The real culprit is usually much simpler and cheaper to fix. This guide will show you the most common failure on these sought-after players and how to repair it yourself.
Is It Really the Laser?
Seeing your CD spin a little and then stop is frustrating. Your first thought might be the laser assembly has failed. On a Technics SL-P990 or similar models with the “SO8” mechanism, that is very rare.
Here is the key sign: If the disc makes any small movement when you close the tray, the laser is likely fine. The machine’s system is trying to work, but it lacks the right power. The problem lies elsewhere in the drive system.
The Secret of the SL-P990: Direct Drive
The Technics SL-P990 is a special machine. It was a flagship model. Higher-end Technics tape decks and the Pro series CD player (SL-P1200) used the same technology.
Unlike many CD players, this model does not use a normal motor with gears. Instead, it uses a direct drive brushless motor. There are no cogs or physical parts to wear out. The spindle floats on a magnetic field.
This motor uses a set of coils and a flywheel. It is fast, quiet, and very reliable. However, age affects one critical part.
The Real Problem: Failed Capacitors
The system that powers the spindle motor has small capacitors. These parts store and release electrical energy. Over decades, these capacitors dry out and fail. They can no longer supply the steady voltage the direct drive motor needs.
When these capacitors fail, the motor does not get enough power. The disc might try to spin but cannot reach the correct speed. The player cannot read the disc, even though the laser is perfect.
This is the most common fault on these Technics players. Fixing it is often quick and costs very little.
How to Access and Replace the Faulty Capacitors
You will need some basic tools: a small screwdriver and a soldering iron. You should also wear an anti-static wrist strap to protect the electronics.
Step 1: Remove the CD Mechanism
- Unplug the player from the wall outlet.
- Open the disc tray.
- Look for two plastic clips on the sides of the transport mechanism.
- Release these clips. The whole CD mechanism unit will loosen and can be lifted up slightly.
Step 2: Disconnect Cables and Remove the Mechanism
- Carefully disconnect the thin ribbon cable from the main board.
- These cables become brittle with age, so be gentle.
- There is also a small grounding screw to remove.
- Once free, you can flip the mechanism over to see the underside.
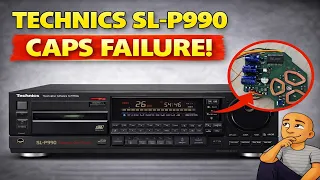
Step 3: Locate the Motor Control PCB
Underneath the central spindle, you will see a small printed circuit board (PCB). This is the board that controls the direct drive motor. You will see the coils and a magnet around the spindle.
Step 4: Replace the Capacitors
- Remove the two screws holding this small PCB.
- On the board, you will see two small surface-mount capacitors.
- These are the parts that fail. They are usually rated at 33 microfarads.
- Carefully desolder the old capacitors.
- Solder in two new capacitors of the same value.
Often, replacing just one of these capacitors is enough to get the player working again. For a permanent fix, it is best to replace both at the same time.
Reassemble and Test Your Player
After soldering the new capacitors, carefully put everything back together.
- Reattach the small PCB with its two screws.
- Flip the mechanism back over.
- Reconnect the ribbon cable and the grounding screw.
- Lower the mechanism back onto its mounts and secure the side clips.
- Slide the disc tray back onto its runners.
Now, plug the player back in. Insert a CD. If the capacitors were the issue, the disc should spin up smoothly and read almost instantly.
Routine Maintenance for a Perfect Player
Once the main fault is fixed, a little cleaning will make your Technics player perform like new. This simple upkeep is important.
Clean the Laser Lens
Use a clean cotton swab with a tiny amount of isopropyl alcohol. Gently wipe the surface of the laser lens to remove any dust or fingerprints. Let it dry completely.
Lubricate the Slide Rails
The laser assembly moves on metal rails. A very light application of proper plastic-safe lubricant helps it move smoothly. This allows the laser to find the focus point faster. Do not use too much.
Clean the Position Sensor
Under the spindle magnet is a position sensor. It helps the system know where the laser is. You can gently clean the contact area to remove any built-up carbon dust. This ensures accurate tracking.
Why the Technics SL-P990 is a Special Player
After this repair, you will see why these machines are so loved. They offer performance that modern players often lack.
- Instant Track Access: There are no slow gears. You can jump from track 1 to track 15 almost instantly.
- Silent Operation: The direct drive motor is extremely quiet. You won’t hear whirring or grinding noises.
- Quality Sound: They feature relay-protected outputs and high-quality audio capacitors. This makes for clean, robust sound.
- Built to Last: Aside from the known capacitor issue, the main power supply and other parts are very well-made. They rarely fail.
The SL-P990 also has a rare feature: a selectable voltage switch. You can set it for 110V (USA), 127V, 220V, or 240V (UK). This makes it a versatile player for anyone in the world.
Conclusion: Don’t Give Up on Your Vintage Technics
A Technics SL-P990 that won’t read discs is not a lost cause. The problem is almost never the expensive laser. The fix is usually two small, cheap capacitors on the motor control board.
This repair is straightforward. With some care and basic soldering skills, you can bring a classic piece of audio equipment back to life. The result is a high-end CD player that works perfectly. It offers speed and quiet operation that is hard to find today.
Do you have one of these machines gathering dust? Open it up and check that small board under the spindle. Replacing those capacitors could be the only thing standing between you and years of flawless music playback.