
How to Fix a Noisy Fan in Your Ubiquiti Switch: A Step-by-Step Guide
Is your network switch suddenly sounding like a jet engine? A loud, rattling fan can turn a quiet home office or server rack into a noisy problem. For owners of certain Ubiquiti switches, a common issue is a failing fan that becomes very loud over time. The good news is that this is often a problem you can fix yourself with some simple tools and a replacement part. This guide will walk you through the entire process of replacing the noisy fans in a 10-gigabit Ubiquiti switch with quieter, reliable aftermarket fans. By the end, you’ll have a cooler, quieter switch without the cost of a full unit replacement.
Tools and Parts You Will Need
Before you start, gather the right tools and parts. Having everything ready will make the job go smoothly.
You will need:
- A set of screwdrivers (likely Phillips head).
- A pair of snippers or a sharp knife.
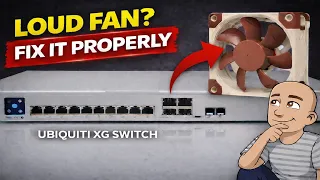
- The replacement fans. The video uses Noctua NF-A4x20 PWM fans. These are known for being quiet and reliable.
Important: Make sure your replacement fans are the PWM type. This means they have a 4-pin connector. Your switch needs this type to control the fan speed correctly. Using the wrong fan type could cause cooling problems.
Step 1: Opening the Switch Case
Your first job is to safely open the switch. Always make sure the device is powered off and unplugged before you start.
- Remove the four screws on the sides of the switch. These screws hold the metal rack ears in place.
- Once the rack ears are off, you will see small screws on each side near the front. Remove these as well.
- On the back of the switch, you will find three more screws. One of these might be hidden under a small warranty seal. You will need to remove all three.
After all these screws are out, the case should be loose. To remove it, slide the top case slightly towards the rear of the switch. Then, you can lift it up and off.
Step 2: Getting to the Fan Assembly
With the case off, you will see the internal fans. However, to actually unplug and replace them, you need to remove a plastic cover, or cowl, inside.
Look for a single screw holding this plastic air guide in place. Remove that screw. Once it’s out, you can carefully lift the plastic piece. This will give you clear access to the fan connectors and the screws holding the fans.
Step 3: Removing the Old Fans
Now you can start the fan swap. Follow these steps carefully.
- First, find the wires from the fans. They are often routed under a screw or a standoff on the circuit board.
- Remove that screw to free the wires. There may be another small screw nearby also holding wires. Taking these out prevents stress on the board and makes pulling the wires easier.
- Gently pull the fan wires up and guide them over any studs or posts on the board. This part can be fiddly. Using your fingers to push the wires from underneath can help.
- Once the wires are free, you can disconnect the fan plugs from their headers on the board.
- Finally, remove the screws that hold the fans themselves to the metal case. Set these screws aside.
Step 4: Preparing and Installing the New Fans
Your new Noctua fans might need a small modification before they fit perfectly.
- Look at the new fan. You will see a small plastic notch or tab on the fan frame. This notch needs to be cut off so the fan sits flat. Use your snippers or a knife to carefully remove this small piece.
- Line up the new fan correctly. The side with the fan label should face the back of the switch. This ensures the fan blows air out the rear, which is the correct exhaust direction.
- Run the fan cable underneath the fan, just like the original one was.
- Push the fan connector onto the header on the board. It should click into place.
- Instead of using the original metal screws, use the small rubber mounts supplied with the Noctua fans. These act as vibration dampeners and help reduce noise further. Push the rubber mounts through the holes in the case from the outside, then fit them through the fan holes. Tighten them on the inside.
- Cut off any excess length from the rubber mounts on the outside of the case.
- Repeat this process for all three fans.
Step 5: Reassembly and Testing
After all new fans are installed, it’s time to put everything back together.
- Replace the plastic internal cowl. Line it up carefully and secure it with the single screw you removed earlier.
- Place the main case back on the switch. Align it at the back first, then gently slide it forward until it sits completely.
- Start by putting the three screws back into the rear of the switch.
- Next, replace the two small screws on each side of the front panel.
- Finally, reattach the metal rack ears using the four larger screws you removed at the very beginning.
Before you put the switch back in your rack, do a quick test. Plug the power in and turn it on. Listen to the new fans. They should spin up quietly when the switch boots. You will notice they are much quieter than the old ones, even under load.
Why This Upgrade Makes Sense
This repair does more than just stop an annoying noise. It extends the life of your equipment. A noisy fan is often a sign of a bearing wearing out. A fan that fails completely can lead to overheating. Overheating can cause your switch to shut down or even get damaged.
Replacing the fans with high-quality, quiet ones like the Noctua models solves the immediate noise problem. It also provides better long-term cooling and reliability. The rubber mounting system further reduces vibrations. This means less wear on the fans and the switch itself.
Conclusion
Fixing a loud fan in your Ubiquiti switch is a straightforward DIY project. You do not need to be an expert. With basic tools and about an hour of your time, you can restore peace and quiet to your workspace. The process involves opening the case, swapping three fans, and putting it all back together. The key is to be careful, take your time, and make sure you use the correct PWM replacement fans.
This guide shows you that you don’t have to live with noisy hardware or pay for an expensive repair. Taking control of simple maintenance like this can save you money and give you a better, more reliable network. Your switch will run cooler and quieter, and you’ll have the satisfaction of fixing it yourself.