
How to Fix a Vintage Technics RS-TR373 Tape Deck with No Audio
https://www.youtube.com/watch?v=o5QWcZ6hLAg
Vintage audio gear has a special charm, but when it stops working, it can be frustrating. A common problem with old tape decks is a complete loss of audio. You press play and get nothing—no sound, no hiss, just silence. This guide walks you through a real-world repair of a classic Technics dual cassette deck that had exactly this issue. By following a logical troubleshooting process, we discovered a simple, inexpensive component failure that brought the entire system back to life. This post will show you how a single, small part can cause total audio failure and how to fix it.
Initial Diagnosis of the Problem
The customer reported the deck was completely dead. When playing any tape, there was no audio output. The VU meters on the display did not move at all. The first step was to confirm the fault.
I connected the deck to a known-good amplifier. Even with the amplifier's volume turned all the way up, there was only a faint background hum. No tape hiss, no music, no sound of any kind came from the speakers. This confirmed a total audio failure.
Both tape decks on the unit were affected. Since both sides failed at once, the problem was likely not the tape heads themselves. A failure in both sets of heads at the same time is very rare. The issue had to be somewhere else in the audio circuit.
A Visual Inspection Before Opening the Case
Before taking anything apart, I checked the mechanical parts. The tape heads looked clean and in good condition. The rubber pinch rollers, however, showed common signs of age. They were yellowed and brittle. These would need replacement for proper tape play, but they were not the cause of the complete lack of audio.
The problem was electrical. With both decks silent, I suspected a failure in a shared part of the circuitry. This pointed to an issue on the main amplifier or preamp board.
Opening the Unit and Locating the Circuit Board
I removed the case from the deck. Inside, the layout was typical for Technics gear of this era. Two separate sets of wires ran from the tape heads. These wires fed into a shared preamplifier circuit on the main board.
My focus went to this main circuit board. Since nothing showed on the display's level meters either, the fault was likely in a stage common to all audio signals. I began a visual scan of the board, looking for obvious signs of damage.
Identifying the Failed Component
I looked at the larger components first. These often handle more power and can fail due to heat. Capacitors on the output stage looked fine. They showed no bulging or leakage.
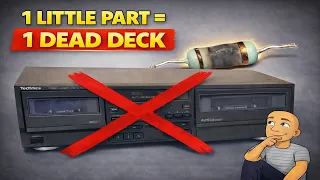
My attention moved to a row of larger resistors. Using a multimeter to test for continuity, I checked their values. One resistor stood out. It measured differently than its twin on the circuit. Visually, it also looked suspicious. There was a small, dark mark on its colored value bands.
This mark could have been a factory flaw. It could also be a tiny burn mark from overheating. The odd measurement and the visual clue made this resistor the prime suspect. If this resistor failed "open," it would break the audio signal path completely. That would explain the total silence.
Removing the Circuit Board for Repair
To replace the resistor, I needed to remove the main circuit board. This required careful disassembly. I took note of all connections, including:
- The power transformer screws.
- Securing screws for the board.
- Cable connectors for the front panel controls.
- The head cables for both tape decks.
With the board free, I took a closer look at the suspect resistor. The dark mark was more visible now. I used soldering tools to carefully desolder and remove the faulty component from the board.
Replacing the Faulty Part
The resistor had a specific value printed on its body. I found an identical replacement in my stock of parts. I soldered the new resistor into the exact same spots on the circuit board. After a cleanup of the solder joints, the repair was done on the component level.
The next step was reassembly. I followed the steps in reverse order:
- Reconnected the tape head cables.
- Reattached the front panel control connectors.
- Secured the board with its screws.
- Reinstalled the power transformer.
Testing the Repair
The moment of truth came with powering the unit back on. I reconnected the deck to the amplifier and inserted a test tape. I pressed play.
This time, the VU meters on the display sprang to life, bouncing with the music. Clear, full audio played through the speakers. The repair was a success. The entire problem was caused by one inexpensive resistor that had burned out over time.
Conclusion: Patience and Logic Restore Vintage Sound
Fixing vintage audio equipment doesn't always require deep expertise. This repair shows the power of methodical troubleshooting. The steps were clear: confirm the fault, inspect visually, locate the shared circuit, test components, and replace the failed part.
The key was understanding that a failure affecting both decks pointed to a common component. A simple multimeter test and a sharp eye identified the culprit. These older Technics decks are well-built. Often, a single worn-out part is all that stops them from working perfectly.
If you have an old tape deck collecting dust due to "no audio," don't give up on it. The fix might be simpler and cheaper than you think. Open it up safely, look for obvious damage, and consider testing the larger resistors in the audio path. With careful work, you can bring the classic sound of tapes back into your home.